It’s fun to build a house, but things can get messy quickly if you don’t have a strategy. Before you choose paint colors, make a list of your goals: how long you plan to live there, who will use each room, and what needs to fit (kids, pets, home office, hobbies). Set a definite deadline and a limit on your budget. Make a list of “must-haves,” “nice-to-haves,” and “not now.” Give this list to your builder and designer so that everyone is on the same page from the start. A good strategy cuts down on adjustments later, which saves time and money.
- Define purpose: long-term home or stepping stone
- Set a realistic max budget and timeline
- Prioritize features to guide trade-offs
Mistake 1: Vague Budgeting
Many builds go over budget because the numbers aren’t detailed. A strong budget goes beyond square-foot estimates. Put expenditures into groups: site work, foundation, frame, roofing, windows, exterior finishes, rough-ins (plumbing, electrical, HVAC), insulation, drywall, interior finishes, fixtures, permits, and extras. When you can, get written quotations and add 10–15% to cover any unexpected costs, like digging up rocks or paying utility bills. Keep track of your costs every week; tiny overruns add up quickly. Find out how allowances work for cabinetry, tiling, and lighting, and what happens if you choose more expensive options later. Clear money rules prevent tough talks and keep decisions grounded.
- Itemize by trade and phase.
- Include taxes, permits, and utility hookups.
- Keep a 10–15% contingency line.
Mistake 2: Underestimating Site Work
Your lot shapes costs more than you think. The kind of soil, the slope, the drainage, and the access all determine how well the excavation, foundation design, and long-term performance work. Request a geotechnical report; it will tell you the bearing capacity, the water table, and any clay that expands. Proper grading keeps water away from the building, which protects the slab or crawl space. Plan for drain tile, sump, and swales if needed. For sloped sites, evaluate stepped footings or retaining walls early—these are not cheap afterthoughts. Confirm where utilities enter and the cost of extending service. Good site prep prevents settlement, damp basements, and erosion.
- Order a soils/geo report.
- Design drainage before framing
- Budget for utility trenching and taps
Mistake 3: Skipping Permits Early
Permits and code checks aren’t paperwork chores; they guard safety and resale value. Late submission of plans can slow down the schedule. To make sure you know what the zoning, setbacks, height, and energy codes are, meet with your local building department early. Inquire about plan reviews and special inspections, such as for shear walls and seismic ties. Send in a full package that includes the site plan, floor plans, elevations, structural details, energy calculations, and truss specifications. To avoid missing inspections that could lead to tearing down, keep an approval tracker. Final occupancy depends on closing every permit loop, so treat it like a critical path item.
- Verify zoning and setbacks.
- Include structural and energy details.
- Track inspections to avoid delays
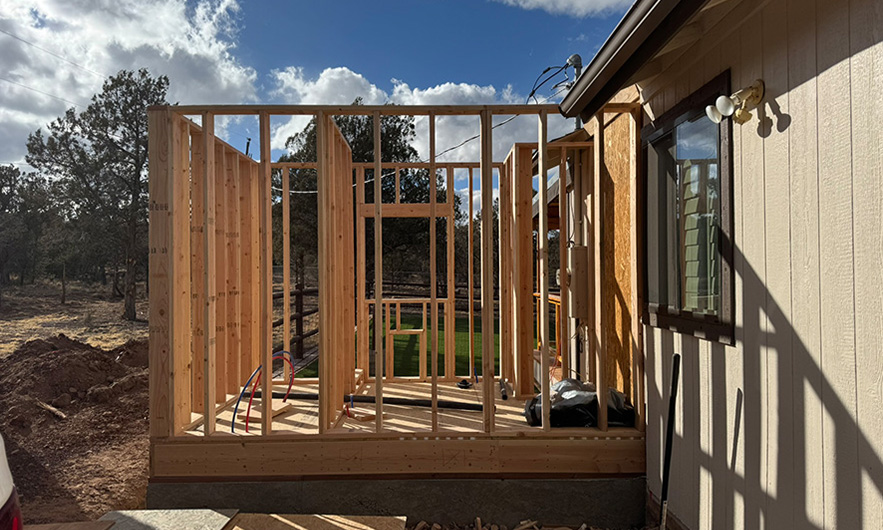
Mistake 4: Weak Structural Choices
The structure is like the bones of your house. If the beams are too long, the headers are too small, or the hold-downs are missing, the flooring and doors may sag. If you live in an area with heavy winds or earthquakes, make sure to have shear walls, anchor bolts, straps, and the right nailing schedules. If you desire huge open areas, get an expert to help you figure out how big LVLs, steel, or moment frames should be. Keep load paths continuous from roof to soil. Don’t cut floor joists for ducts or plumbing without approved details. Structural fixes after drywall are costly and messy. Build it right, and everything else—trim, tile, doors—fits better.
- Engineer long spans and openings
- Maintain continuous load paths
- Protect joists from unapproved cuts
Mistake 5: Poor HVAC Planning
People typically use rules of thumb to figure out how big their heating and cooling systems should be, which makes rooms too hot, corners too cold, and bills too high. Get a Manual J heat-load estimate, a Manual S equipment match, and a Manual D duct design. Put returns in important rooms, not simply hallways, and make sure that furniture doesn’t obstruct supply registers. If you live in a humid area, arrange for separate dehumidification. If you live in a dry or cold area, think about ERVs to get fresh air without losing energy. Use mastic to seal ducts, not tape, and then test the pressure. A well-designed system is more comfortable and costs less to run.
- Insist on Manual J/S/D
- Seal and test the ductwork
- Plan fresh air and humidity control
Mistake 6: Overlooking Building Envelope
The insulation, air barrier, windows, and doors on the outside of your home affect how comfortable and long-lasting it is. Air leaks make it drafty and wet. At the external sheathing, there should be a continuous air barrier with taped seams and sealed penetrations. Choose insulation based on the weather and how it will be put together. For example, use dense-pack cellulose, spray foam in hard-to-reach places, or stiff foam on the outside to cut down on thermal bridges. Windows should have low-E coatings that are right for your climate and be put in with flashing that lets water run off. Ask for a blower-door test before drywall to find leaks when fixes are cheap. A tight envelope boosts energy savings.
- Continuous air barrier strategy
- Climate-appropriate insulation choices
- Blower-door test to verify tightness
Mistake 7: Inefficient Layouts
A beautiful plan can still function poorly. Think about daily flow: entry drop zone, kitchen work triangle, laundry near bedrooms, and clear paths without pinch points. Align plumbing stacks to shorten runs and save cost. Keep mechanical rooms central to reduce duct lengths. Plan for real furniture sizes and door swings; a 36-inch hallway and at least 42 inches around kitchen islands improve movement. Add blocking in bathroom walls for future grab bars. Small tweaks on paper prevent big headaches on site and make living easier for years.
- Stack wet walls vertically.
- Size halls and clearances generously
- Add wall blocking for future needs
Mistake 8: Lighting and Power Gaps
Lighting affects mood and safety. Mix layers: ambient (ceiling), task (under-cabinet, reading), and accent (toe-kicks, art). Put bright, glare-free task lights where you work most: kitchen counters, vanities, and desks. Space recessed cans to avoid shadows and “cave” ceilings. Add plenty of outlets where devices live: sofa sides, beds, office, garage, and patio. Put charging stations in mudrooms or kitchens. Use dimmers widely and three-way switches on major paths. Exterior lights should cover entries and walks without blinding neighbors. A thoughtful plan reduces extension cords and dark corners.
- Layer ambient, task, accent
- Place outlets for real life
- Add dimmers and three-ways
Mistake 9: Weak Moisture Management
Water is the worst thing that can happen to a house. Start at the roof: make sure there are good overhangs, a good underlayment, and flashing where the roof meets the walls and where it goes through. Use drainage planes and kick-out flashing at the seams between the roof and the walls. Use back dams and pan flashing to seal around windows. Install footing drains, damp-proofing, and capillary breaks between concrete and wood at the base. There are vent baths and a dryer inside, as well as slope shower pans and sealed tile backer boards outside. Use a vapor barrier and condition the space or seal it well in crawl spaces. These techniques stop rot, mold, and expensive repairs.
- Overhangs and proper flashing
- Drainage planes and pan flashings
- Foundation drains and vapor barriers
Mistake 10: Change Orders Late
Late changes drain budgets and time. Moving a wall changes the electrical, HVAC, flooring, and inspections. Lock in big choices like windows, doors, roofing, siding, cabinetry, tiling, and plumbing fixtures before framing so that the lead times match the timetable. Use samples and prototypes to make sure the finishes and grout lines are right. Before any work starts, make sure you have a proper change order process in writing that includes the effects on price and schedule. A 3D model or taped floor plan on site helps you see how big the rooms are, so you don’t change your mind later. Decide early, save later.
- Finalize key selections early.
- Price and approve changes in writing
- Use mockups and on-site layouts
Mistake 11: Skimping on Storage
Storage isn’t a luxury; it’s a way to feel comfortable every day. Plan closets with double-hang areas, shelving for containers, and places just for shoes and luggage. Add a walk-in pantry or tall cabinets for things you buy in bulk. Put a mudroom with hooks, cubbies, and a bench at the door that people use the most. For seasonal gear, think about vertical racks and ceiling storage in the garage. Linen closets near bathrooms save steps. Don’t forget cleaning tools—an outlet for a stick vac and a pull-out for brooms. Built-in storage costs less during construction than after move-in.
- Double-hang closet sections
- Mudroom with hooks and a bench
- Pantry or tall kitchen storage
Mistake 12: Overlooking Future Proofing
Your home should adapt as life changes. Run an empty conduit from the mechanical room to the attic and to key walls for future wires. Add blocking for tech and smart gear that is mounted on the wall. For long-term accessibility, choose doorways that are 34 to 36 inches wide and showers that don’t have curbs. Even if you install them later, plan for power and support for solar panels, electric vehicle charging, or a backup generator. Add extra outlets at the eaves for Christmas lights and at the soffits for cameras. These cheap steps will keep your investment safe and make upgrading much easier.
- Conduit paths for future cabling
- Wider doors and curbless showers
- Prep for solar and EV charging
Quick Quality Checks
Simple checks catch big problems. Ask for pre-drywall walkthroughs to review framing, plumbing, wiring, and insulation before walls are closed. Take photos of every wall; they become a map for future repairs. Verify window flashing and door thresholds after rain, if possible. Confirm that the bathroom exhaust moves air with a tissue test on the grille. Request duct pressure tests and a blower-door test with a report. Inspect tile layouts dry before setting. Keep a punch list and update it weekly until every item is closed.
- Pre-drywall and photo documentation
- Test ventilation and duct tightness
- Maintain a living punch list
Wrapping It Up
A successful build comes down to planning, details, and steady communication. Set a clear budget with a buffer, respect what your lot demands, and get permits and inspections right the first time. Lean on engineers for spans and loads, and design HVAC with real calculations. Tighten the building envelope, think through lighting, storage, and future upgrades, and decide early to avoid last-minute changes. Keep simple checklists and photo records so nothing slips. If you want a steady partner from first sketch to final walkthrough, reach out to Got Ur Six Custom Builders.